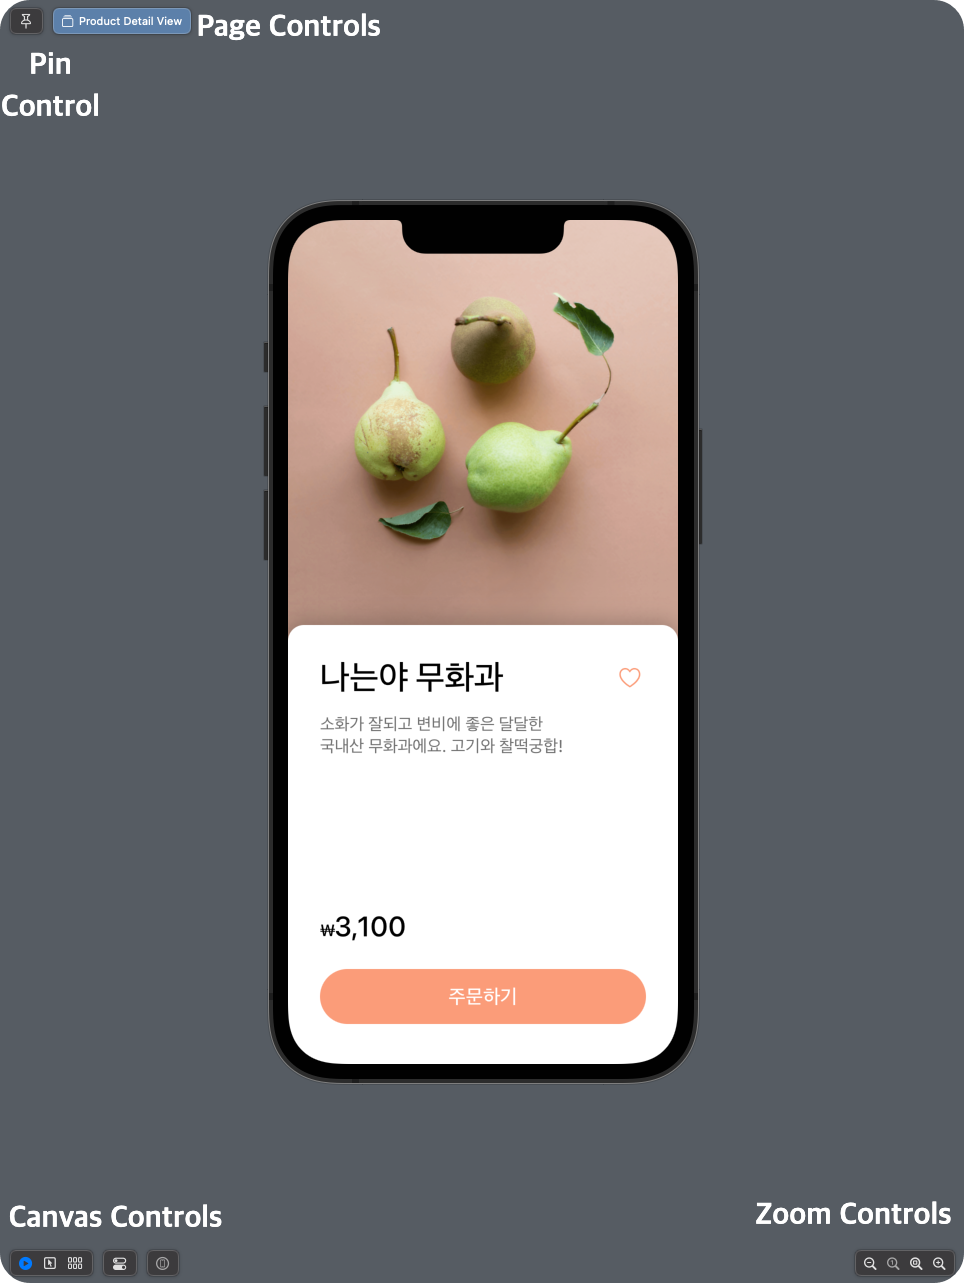
1. PreView관련 용어

📌 PinControl 📌
📖 PageControls 📖
✍🏼 Canvas Controls ✍🏼
(왼쪽부터)
- Live: 실시간으로 동작(버튼, 스크롤 등등 작동함)
- Seclectable: 실시간으로 동작하지 않음(버튼, 스크롤 등등 작동하지 않음)
- Variants
- Color Sceheme Variants: Light모드와 Dark모드를 비교해서 보여줌.
- Orientation Variants: 세로모드, 가로모드(좌측으로), 가로모드(우측으로)된 화면을 비교해서 보여줌
- Dynamic Type Variants: 지정된 12가지 사이즈에 따른 다양한 UI를 비교해서 보여줌
- Device Settings: 하나의 PreView에서 다크모드로 할건지 안 할건지, 가로모드로 할건지 세로모드로 할건지 설정할 수 있음.
- Preview on Device:
🔍 ZoomControls 🔍
(왼쪽부터)
- Zoom out: 축소
- Zoom to 100%: 100%로 확대(축소)
- Zoom to fit: PreView 자체 크기에 맞게 확대(축소)
- Zoom in: 확대
2. PreView 수식어
[수식어 사용법]
아래와 같이 View 뒤에 수식어를 작성해주면 된다.struct ContentView_Previews: PreviewProvider { static var previews: some View { ContentView() .previewDevice(PreviewDevice(rawValue: "iPhone 11 Pro")) } }
1. 원하는 기기로 변경이 가능하다. (아래의 기능 목록 참고)
//하나의 기기만 보는 경우
struct ProductDetailView_Previews: PreviewProvider {
  static var previews: some View {
    ProductDetailView(product: productSamples[0])
          .previewDevice(PreviewDevice(rawValue: "iPhone 12 Pro"))
  }
}


//여러 기기를 보는 경우
struct ProductDetailView_Previews: PreviewProvider {
  static var previews: some View {
      ForEach(["iPhone 11 Pro", "iPhone 14 Pro", "iPhone 8"], id: \.self) {
          ProductDetailView(product: productSamples[0])
                .previewDevice(PreviewDevice(rawValue: $0))
      }

  }
}
Мас"
"iPhone 7"
"iPhone 7 Plus"
"iPhone 8"
"iPhone 8 Plus"
"iPhone SE"
"iPhone X"
"iPhone Xs"
"iPhone X Max"
"iPhone XR"
"iPhone 11"
"iPhone 11 Pro"
"iPhone 12 mini"
"iPhone 12"
"iPhone 12 Pro"
"iPhone 14"
"iPhone 14 Plus"
"iPhone 14 Pro"
"iPad mini 4"
"iPad Air 2"
"iPad Pro (9.7-inch)"
"iPad Pro (12.9-inch)"
"iPad (5th generation)"
"iPad Pro (12.9-inch) (2nd generation)"
"iPad Pro (10.5-inch)"
"iPad (6th generation)"
"iPad Pro (11-inch)"
"iPad Pro (12.9-inch) (3rd generation)"
"iPad mini (5th generation)"
"iPad Air (3rd generation)"
"Apple TV"
"Apple TV 4K"
"Apple TV 4K (at 1080p)"
"Apple Watch Series 2 - 38mm"
"Apple Watch Series 2 - 42mm"
"Apple Watch Series 3 - 38mm"
"Apple Watch Series 3 - 42mm"
"Apple Watch Series 4 - 40mm"
"Apple Watch Series 4 - 44mm"
2. 이름 지정하기
struct ProductDetailView_Previews: PreviewProvider {
  static var previews: some View {
      ForEach(["iPhone 11 Pro", "iPhone 14 Pro", "iPhone 8"], id: \.self) {
          ProductDetailView(product: productSamples[0])
                .previewDevice(PreviewDevice(rawValue: $0))
                .previewDisplayName($0) // 기기명 지정
      }

  }
}
3. 레이아웃 변경하기
| 구분 | 설명 |
| device | 기본값이다. 컨테이너 기기 본래의 크기와 형태로 나타난다. |
| sizeThatFits | 컨테이너를 프리뷰의 크기에 맞춰서 유동적으로 조절한다. |
| fixed(width: height:) | 지정한 너비와 높이 맞춰서 컨테이너의 크기를 고정한다. |
// 사용법
struct ProductDetailView_Previews: PreviewProvider {
  static var previews: some View {
      ProductDetailView(product: productSamples[0])
          .previewLayout(.fixed(width: 100, height: 100))

  }
}
3. EnvironmentValues
4.
'iOS - 실무관련 > SwiftUI' 카테고리의 다른 글
| GeometryReader (2) | 2022.09.23 |
|---|---|
| List (0) | 2022.09.20 |
| NavigationLink (0) | 2022.09.20 |
| NavigationView (0) | 2022.09.20 |
| Button (0) | 2022.09.14 |


